了解如何使用地图组件
通过本节,你将学会:
marker,groundoverlay等覆盖物示例代码:
<template>
  <div>
    <map
      style="width:{{width}}; height:{{height}}"
      latitude="{{latitude}}"
      longitude="{{longitude}}"
      scale="{{scale}}"
      coordtype="{{coordtype}}"
    >
    </map>
  </div>
</template>
<script>
  const BEI_JING_WGS = {
    latitude: 39.9073728469,
    longitude: 116.3913445961,
    coordType: 'wgs84'
  }
  export default {
    private: {
      width: '100%',
      height: '50%',
      latitude: BEI_JING_WGS.latitude,
      longitude: BEI_JING_WGS.longitude,
      coordtype: BEI_JING_WGS.coordType,
      scale: 17
    }
  }
</script>
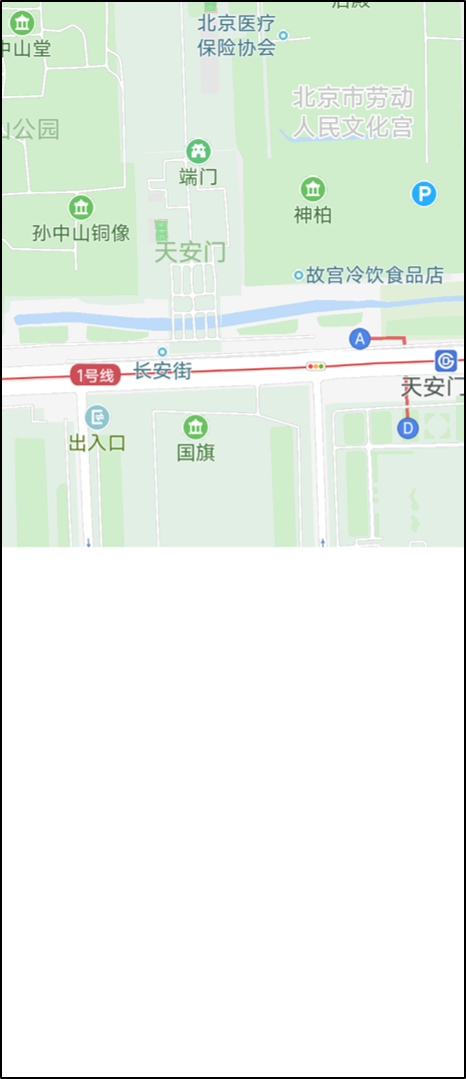
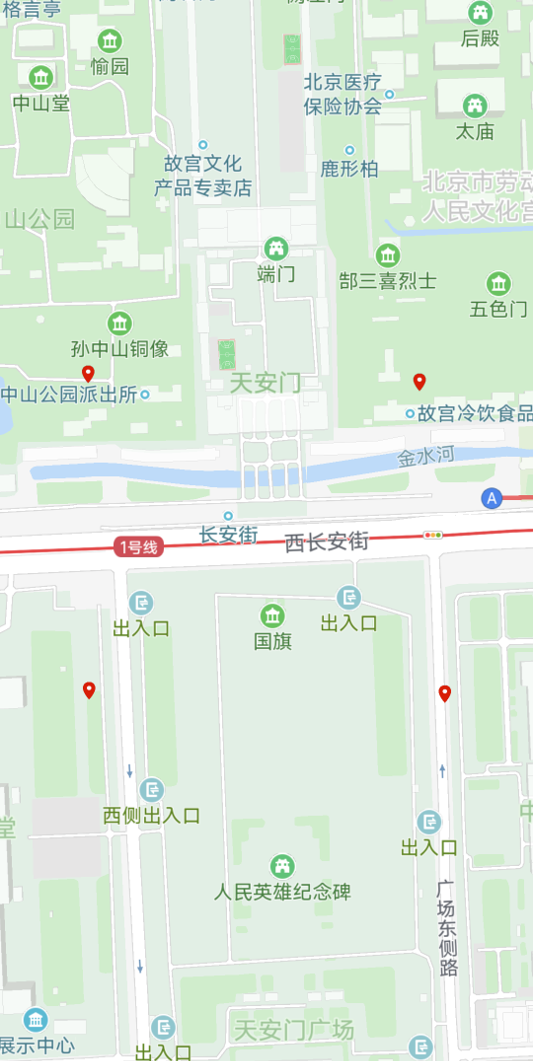
该示例演示了如何自定义地图组件的宽高、调整地图组件的中心位置以及缩放级别。
示例截图:
地图组件当前支持四种覆盖物,包括:marker、groundoverlay、polyline 和 circle。
示例代码:
<template>
  <div>
    // 地图中心默认是北京
    <map
      style="width:{{width}}; height:{{height}}"
      scale="{{scale}}"
      coordtype="{{coordtype}}"
      markers="{{markers}}"
      groundoverlays="{{groundoverlays}}"
      polylines="{{polylines}}"
      circles="{{circles}}"
    >
    </map>
  </div>
</template>
<script>
  const COORDTYPE = 'wgs84'
  const BEI_JING_WGS = {
    latitude: 39.9073728469,
    longitude: 116.3913445961,
    coordType: COORDTYPE
  }
  const POINT1 = {
    latitude: 39.9069550115,
    longitude: 116.3932842749,
    coordType: COORDTYPE
  }
  const POINT2 = {
    latitude: 39.904169422,
    longitude: 116.3893937341,
    coordType: COORDTYPE
  }
  export default {
    private: {
      width: '100%',
      height: '50%',
      scale: 17,
      coordtype: COORDTYPE,
      markers: [
        {
          latitude: BEI_JING_WGS.latitude,
          longitude: BEI_JING_WGS.longitude,
          coordType: BEI_JING_WGS.coordType,
          iconPath: '/Common/marker.png',
          width: '100px'
        }
      ],
      groundoverlays: [
        {
          northEast: POINT1,
          southWest: POINT2,
          iconPath: '/Common/logo.png',
          opacity: 0.5
        }
      ],
      polylines: [{ points: [POINT1, POINT2] }],
      circles: [
        {
          latitude: POINT1.latitude,
          longitude: POINT2.longitude,
          coordType: COORDTYPE,
          radius: 50
        }
      ]
    }
  }
</script>
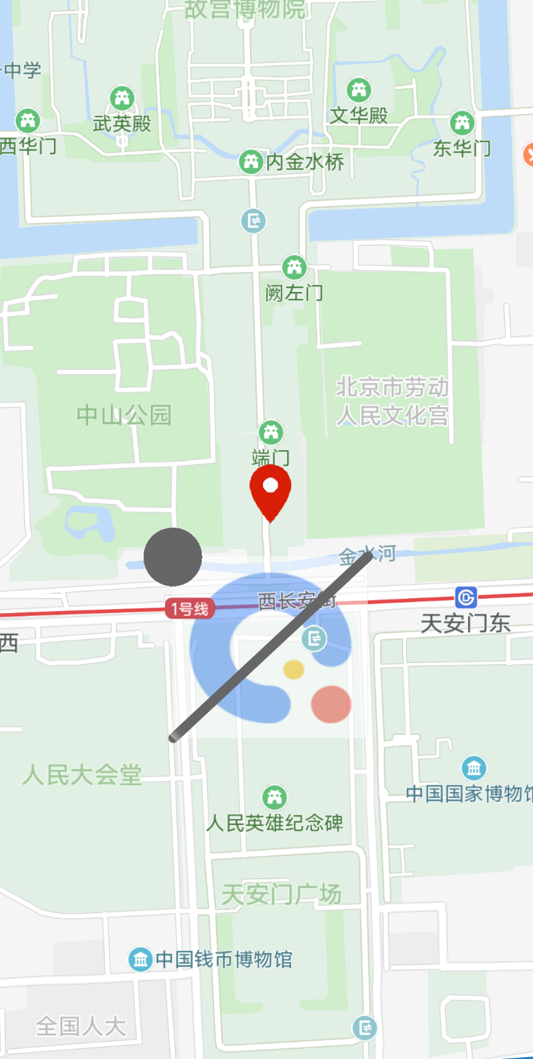
该示例演示了如何在地图组件上添加覆盖物。
示例截图:
marker 可以通过点击或者常显的方式显示一个文本为用来描述和对应 marker 相关的信息。
示例代码:
<template>
  <div>
    <map
      style="width:{{width}}; height:{{height}}"
      scale="{{scale}}"
      markers="{{markers}}"
    >
    </map>
  </div>
</template>
<script>
  const COORDTYPE = 'wgs84'
  const MARKER_PATH = '/Common/marker.png'
  const BEI_JING_WGS = {
    latitude: 39.9073728469,
    longitude: 116.3913445961,
    coordType: COORDTYPE
  }
  export default {
    private: {
      scale: 17,
      markers: [
        {
          width: '100%',
          height: '50%',
          latitude: BEI_JING_WGS.latitude,
          longitude: BEI_JING_WGS.longitude,
          coordType: BEI_JING_WGS.coordType,
          iconPath: MARKER_PATH,
          width: '100px',
          callout: {
            content: '这里是\n北京',
            padding: '20px 5px 20px 5px',
            borderRadius: '20px',
            textAlign: 'left',
            display: 'always'
          }
        }
      ]
    }
  }
</script>
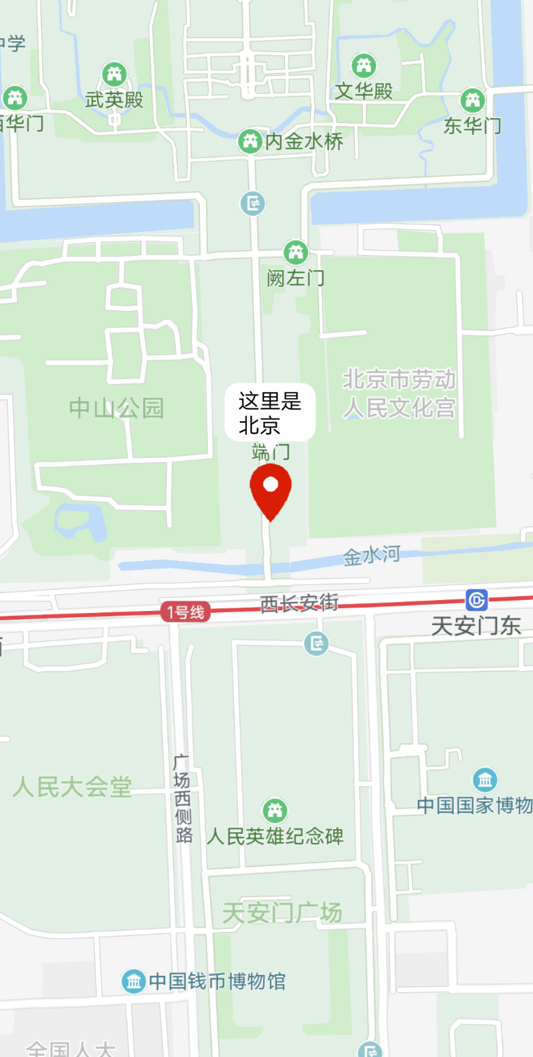
该示例展示了在对应的 marker 上展示常显文本气泡。
由于文本气泡是无法自定义宽高的,即气泡根据文本内容自适应宽高,那么也就说明textAlign属性,只有文本内容中包含换行符("\n")的时候,才会有直观的可视效果。
示例截图:
地图组件可以实现指定 marker 的移动动画。
示例代码:
<template>
  <div>
    <map
      style="width:{{width}}; height:{{height}}"
      id="map"
      scale="{{scale}}"
      markers="{{markers}}"
      polylines="{{polylines}}"
      @tap="tap"
    >
    </map>
  </div>
</template>
<script>
  const POINT1 = { latitude: 39.9090371069, longitude: 116.3953853161 }
  const POINT2 = { latitude: 39.9089550115, longitude: 116.3992842749 }
  export default {
    private: {
      width: '100%',
      height: '50%',
      scale: 17,
      markers: [
        {
          id: 1,
          latitude: POINT1.latitude,
          longitude: POINT1.longitude,
          anchor: { x: 0.5, y: 0.5 },
          iconPath: '../Common/carA.png',
          width: '100px'
        }
      ],
      polylines: [{ points: [POINT1, POINT2] }]
    },
    tap() {
      this.$element('map').translateMarker({
        markerId: 1,
        destination: POINT2,
        autoRotate: true,
        duration: 5000
      })
    }
  }
</script>
该示例展示了 marker 在地图组件中的移动。marker 的图标是一辆小车,在起点位置没有任何的旋转,点击地图,触发小车向目标地点移动,并且在移动过程中,小车的图标自动进行旋转,始终保持车头朝向目标地点。
示例截图:

开发者能够在地图组件上添加可以响应点击事件的自定义控件。
示例代码:
<template>
  <div>
    <map
      style="width:{{width}}; height:{{height}}"
      id="map"
      scale="{{scale}}"
      controls="{{controls}}"
      @controltap="controlTap"
    >
    </map>
  </div>
</template>
<script>
  import prompt from '@system.prompt'
  export default {
    private: {
      width: '100%',
      height: '50%',
      scale: 17,
      controls: [
        {
          id: 1,
          position: { right: '15px', bottom: '300px', width: '70px' },
          iconPath: '/Common/plus.png'
        },
        {
          id: 2,
          position: { right: '15px', bottom: '200px', width: '70px' },
          iconPath: '/Common/minus.png'
        }
      ]
    },
    controlTap(res) {
      switch (res.controlId) {
        case 1:
          this.scale++
          // 因为地图缩放级别有上限,防止持续生成无效值
          this.$element('map').getScale({
            success: res => {
              this.scale = res.scale
            }
          })
          prompt.showToast({ message: '控件:放大地图' })
          break
        case 2:
          this.scale--
          // 因为地图缩放级别有下限,防止持续生成无效值
          this.$element('map').getScale({
            success: res => {
              this.scale = res.scale
            }
          })
          prompt.showToast({ message: '控件:缩小地图' })
          break
        default:
          break
      }
    }
  }
</script>
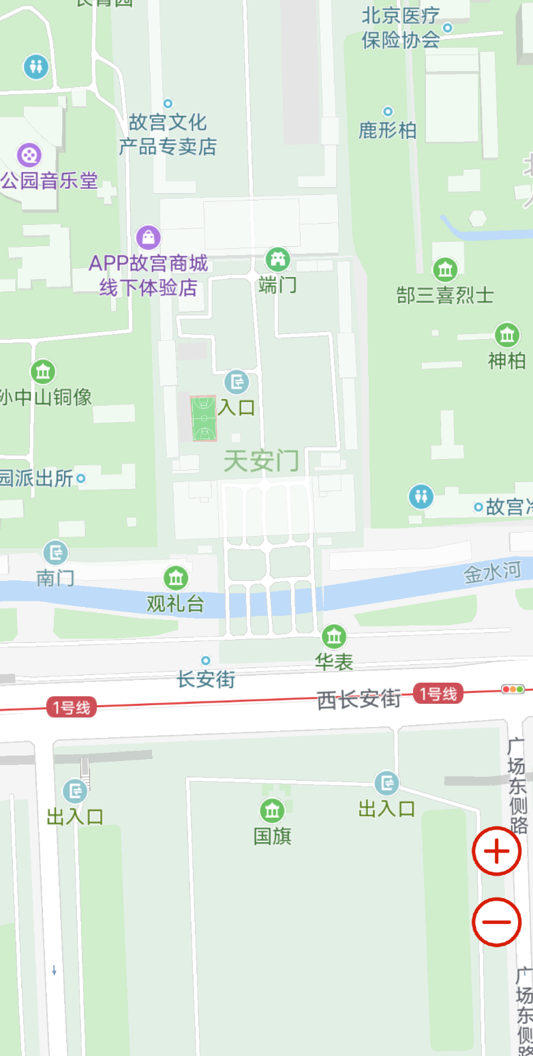
该示例在地图组件上放置了两个用来放大和缩小地图显示级别的控件按钮,点击控件按钮,触发地图组件的控件点击事件,通过 id 识别被点击的控件,然后分别进行逻辑处理。
示例截图:
开发者可以实现在地图组件的可视范围内显示给定的系列坐标点,当地图组件上有控件或者其他快应用组件遮挡的时候,使用includePoints()方法并在参数对象上加一个 padding 属性,可以对显示区域进一步进行约束。
示例代码:
<template>
  <div>
    <!-- includepoints 属性设置-->
    <map style="width:{{width}}; height:{{height}}" id="map" includepoints="{{includepoints}}" markers="{{markers}}" @loaded="loaded">

    <!-- includepoints 方法设置-->
     <map style="width:{{width}}; height:{{height}}" id="map"  markers="{{markers}}" @loaded="loaded">
    </map>
  </div>
</template>
<script>
  const COMMON_MARKER = { iconPath: "/Common/marker.png", width: "30px" }
  const POINT1 = { latitude: 39.9090371069, longitude: 116.3953853161 }
  const POINT2 = { latitude: 39.9089550115, longitude: 116.3992842749 }
  const POINT3 = { latitude: 39.9061293143, longitude: 116.3995796987 }
  const POINT4 = { latitude: 39.9061694220, longitude: 116.3953937341 }
  const POINTS_LIST = [POINT1, POINT2, POINT3, POINT4]
  export default {
    private: {
      width: "100%",
      height: "50%",
      markers: null,
      includepoints: null
    },
    onInit() {
      this.markers = POINTS_LIST.map(item => Object.assign({}, COMMON_MARKER, item))
    },
    loaded() {
      // 方法和属性实现,二者取其一

      // includepoints 属性设置最佳视口
      this.includepoints = POINTS_LIST

      // includepoints 方法设置最佳视口
      // this.$element("map").includePoints({ points: POINTS_LIST })
    }
  }
</script>
该示例演示了如何在地图组件整个可视范围内,展示所有给定的坐标点(给定坐标点都已经用小 marker 指出)。
除了属性可以实现这样的效果,也可以通过includePoints()方法实现,参见示例中被注释的代码部分。
需要注意的是,无论是属性还是方法,需要地图渲染完毕才能生效,因此示例代码中是在loaded事件方法中实现的。
示例截图:
示例代码:
<template>
  <div>
    <map
      style="width:{{width}}; height:{{height}}"
      id="map"
      showmylocation="{{showmylocation}}"
      @tap="tap"
    >
    </map>
  </div>
</template>
<script>
  export default {
    private: {
      width: '100%',
      height: '50%',
      scale: 17,
      showmylocation: true
    },
    tap() {
      this.$element('map').moveToMyLocation()
    }
  }
</script>
该示例演示了如何通过属性和方法的方式展示当前位置。
showmylocation属性被置为 true 的时候,地图组件的可视中心会调整到移动设备的当前位置,并且显示定位 UI,包括定位点、移动设备朝向箭头以及定位精度范围指示圈。
moveToMyLocation()方法只会将地图组件的可视中心调整到移动设备当前位置。
在使用地图组件过程中,坐标参数的坐标系如果和当前地图的坐标系不一致,则需要进行坐标转换。
快应用地图组件支持的坐标系可通过 getSupportedCoordTypes 获取;当前的地图中心位置的坐标系可以通过 getCoordType 获取。
对坐标进行坐标系转换有显式和隐式两种方式: 显式坐标转换使用 convertCoord 方法,需要注意的是 from 到 to 的转换可能不支持,这种情况下会 fail 回调会执行; 隐式坐标转换只需要在属性或者接口里的 coordType 参数里传入坐标点参数的坐标系,由地图组件进行隐式转换,自动转换到当前地图位置的坐标系,如果转换不支持,或者不设置 coordType,则使用原始坐标。
示例代码:
<template>
  <div>
    <map
      style="width:{{width}}; height:{{height}}"
      id="map"
      scale="{{scale}}"
      markers="{{markers}}"
    >
    </map>
  </div>
</template>
<script>
  const MARKER_PATH = '/Common/marker.png'
  const BEI_JING_WGS = { latitude: 39.9077798469, longitude: 116.3912285961 }
  export default {
    private: {
      width: '100%',
      height: '50%',
      scale: 16,
      markers: null
    },
    onShow() {
      var wgsPoint = {
        latitude: BEI_JING_WGS.latitude,
        longitude: BEI_JING_WGS.longitude,
        coordType: 'wgs84',
        iconPath: MARKER_PATH,
        width: '50px'
      }

      this.$element('map').convertCoord({
        from: 'wgs84',
        to: 'gcj02',
        latitude: BEI_JING_WGS.latitude,
        longitude: BEI_JING_WGS.longitude,
        success: res => {
          var gcjPoint = {
            latitude: res.latitude,
            longitude: res.longitude,
            rotate: 180,
            iconPath: MARKER_PATH,
            width: '50px'
          }
          this.markers = [gcjPoint, wgsPoint]
        }
      })
    }
  }
</script>
该示例演示了如何利用地图组件的方法对特定坐标进行坐标转换,并且在地图上使用 marker 将这两个不在同一个坐标系下的坐标点标识出来,可以看出来,这两个坐标标识的是同一个点。
坐标转换方法 from 目前仅支持wgs84。
示例截图:

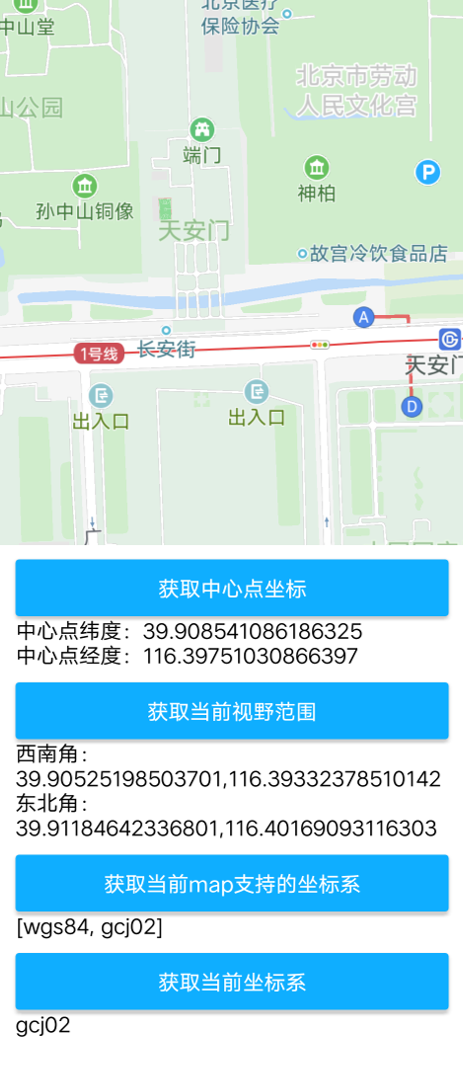
地图组件还有部分方法、事件,在这个里进行示例说明。
如下示例演示了地图组件 getCenterLocation(获取地图中心点坐标)、getRegion(获取当前地图视野范围)、getSupportedCoordTypes(获取地图当前支持的坐标系)、getCoordType(获取地图当前使用的坐标系)方法的使用。
示例代码:
<template>
  <div class="tutorial-page">
    <map id="map" style="width:{{width}}; height:{{height}}" latitude="{{latitude}}" longitude="{{longitude}}" scale="{{scale}}"
      coordtype="{{coordtype}}">
    </map>
    <div class="tutorial-method">
      <input type="button" value="获取中心点坐标" class="btn" @click="getCenterLocation"></input>
      <text class="item-title">{{centerlocation}}</text>
      <input type="button" value="获取当前视野范围" class="btn" @click="getRegion"></input>
      <text class="item-title">{{region}}</text>
      <input type="button" value="获取当前map支持的坐标系" class="btn" @click="getSupportedCoordTypes"></input>
      <text class="item-title">{{supportedcoordtypes}}</text>
      <input type="button" value="获取当前坐标系" class="btn" @click="getCoordType"></input>
      <text class="item-title">{{coordtypeformap}}</text>
    </div>
  </div>
</template>

<style>
  .btn {
    height: 80px;
    text-align: center;
    border-radius: 5px;
    margin-top: 20px;
    margin-right: 20px;
    margin-left: 120px;
    color: #ffffff;
    font-size: 30px;
    background-color: #0faeff;
  }

  .item-title {
    border-radius: 5px;
    margin-right: 20px;
    margin-left: 120px;
    color: #000000;
  }

  .tutorial-page {
    flex-direction: column;
    flex: 1;
  }

  .tutorial-method {
    flex-direction: column;
    flex: 1;
  }
</style>

<script>
  export default {
    private: {
      width: "100%",
      height: "50%",
      scale: 17,
      centerlocation: "",
      region: "",
      supportedcoordtypes: "",
      coordtypeformap: ""
    },
    getCenterLocation() {
      this.$element('map').getCenterLocation({
        success: res => {
          this.centerlocation = `中心点纬度:${res.latitude}\n中心点经度:${res.longitude}`
        }
      })
    },
    getRegion() {
      this.$element('map').getRegion({
        success: res => {
          this.region = `西南角:\n${res.southwest.latitude},${res.southwest.longitude}\n东北角:\n${res.northeast.latitude},${res.northeast.longitude}`
        }
      })
    },
    getSupportedCoordTypes() {
      this.$element('map').getSupportedCoordTypes({
        success: res => { this.supportedcoordtypes = res.coordTypes; }
      })
    },
    getCoordType: function () {
      this.$element('map').getCoordType({
        success: res => { this.coordtypeformap = res.coordType; }
      })
    }
  }
</script>
示例截图:
如下示例演示了地图组件 regionchange(视野发生变化)、markertap(点击地图标记点)、callouttap(点击标记点对应弹窗)事件的使用。
示例代码:
<template>
  <div class="tutorial-page">
    <map
      scale="{{scale}}"
      style="width:{{width}}; height:{{height}}"
      markers="{{markers}}"
      @regionchange="regionchange"
      @markertap="markerTap"
      @callouttap="calloutTap"
    >
    </map>
    <div class="tutorial-event">
      <text class="item-title">{{regionchangetip}}</text>
      <text class="item-title">{{markertaptip}}</text>
      <text class="item-title">{{callouttaptip}}</text>
    </div>
  </div>
</template>

<style>
  .item-title {
    border-radius: 5px;
    margin-right: 20px;
    margin-left: 120px;
    margin-top: 20px;
    color: #000000;
  }

  .tutorial-page {
    flex-direction: column;
    flex: 1;
  }

  .tutorial-event {
    flex-direction: column;
    flex: 1;
  }
</style>

<script>
  const COORDTYPE = 'wgs84'
  const MARKER_PATH = '/Common/marker.png'
  const BEI_JING_WGS = {
    latitude: 39.9073728469,
    longitude: 116.3913445961,
    coordType: COORDTYPE
  }
  export default {
    private: {
      scale: 17,
      width: '100%',
      height: '50%',
      markers: [
        {
          id: 1020,
          latitude: BEI_JING_WGS.latitude,
          longitude: BEI_JING_WGS.longitude,
          coordType: BEI_JING_WGS.coordType,
          iconPath: MARKER_PATH,
          width: '100px',
          callout: {
            content: '这里是\n北京',
            padding: '20px 5px 20px 5px',
            borderRadius: '20px',
            textAlign: 'left',
            display: 'always'
          }
        }
      ],
      regionchangetip: '',
      markertaptip: '',
      callouttaptip: ''
    },
    regionchange(res) {
      this.regionchangetip = `地图视野发生变化\n西南角:\n${
        res.southwest.latitude
      },${res.southwest.longitude}\n东北角:\n${res.northeast.latitude},${
        res.northeast.longitude
      }`
    },
    markerTap(res) {
      this.markertaptip = `Marker被点击, id:${res.markerId}`
    },
    calloutTap(res) {
      this.callouttaptip = `Callout被点击, marker id:${res.markerId}`
    }
  }
</script>
示例截图:
